Continue to Site

Welcome to our site!

Electro Tech is an online community (with over 170,000 members) who enjoy talking about and building electronic circuits, projects and gadgets. To participate you need to register. Registration is free. Click here to register now.

  • Welcome to our site! Electro Tech is an online community (with over 170,000 members) who enjoy talking about and building electronic circuits, projects and gadgets. To participate you need to register. Registration is free. Click here to register now.

Toner transfer release agents.

Status
Not open for further replies.
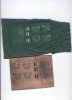
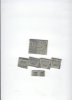
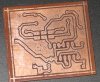
EXCELLENT transfer using the PULSAR method and a laminator.

Your definition of excellent and mine seem to differ a little. One of your components didn't transfer fully (middle top). I also see a few area's that are deformed and missing bits.

I'm not dis'ing the process, because I know it works, but I think you might want to fiddle with some things to try and get it even better. I'm no expert with the Pulsar stuff, but I'm sure someone else here can suggest something.
 
Saw that after I scaned the board

didn't see any ink on the paper after I removed it.
after looking at board I find I failed to CLEAN it really good after I made yesterdays mistakes.
the traces missing are of no concern anyway.
the bits must have come off when I did the TRF wrong (applied w/ shinny side to ink) then redid the foil right.
I looked at the paper = no bits so it had to come off due to a finger print or ??
Like I said the boards I have been doing of late are coming out almost if not perfect (if I paid more attention to what I am doing, operator error) since I purchased a laminator, put through several times then cooled in water immediately.
One thing that I forgot to mention when printing a board is some printers will not deposit enought ink if printing large printed areas such as filled plains. Pulsar said it is due to the fact that some printers can't keep up with the ink when doing large filled printed areas.
 
The transfer is fine

I check the paper after removing for traces and there are / none left behind.
Only thing I figure is I failed to clean the board thoroughly.
After I etched I found traces of the previous transfer that I had done on same board but failed to clean off completely.Need to clean better next time.
I let the laminator run for 1/2 hour before using then run the board 4-5 times through the laminator just to be sure.
then cool and remove paper. check for bits of black still on paper.
none appeared so I figured it came off when I did the foil.
Board is etched and drilled ready for cleaning but have no acetone.
now need to get some more acetone, hydrogen peroxide and muratic acid for next time.
the acetone removes the ink very quickly. very little rubbing.
then apply the liquid tin.
then cut out and solder tonight.
 
Acetone is cheaper and less volatile?

not sure about volatile but one dosn't ned gloves to handle.
only takes a cloth diped in acetone and 3 - 4 strokes and its a done deal
here are the boards done (need a little trimming but basically done.) and the liquid tin applied makes for easier soldering IMO
I tried making some .006 (.15mm) traces and yes its really easy and they came out nice and straight, no voids etc.
see the bottom 2 boards, the trace surrounding the 3 smd pads for LEDs.
 

Attachments

  • pcboard.jpg
    pcboard.jpg
    172.9 KB · Views: 275
  • pcboard 001.jpg
    pcboard 001.jpg
    100.8 KB · Views: 295
{snip}

I've never had that problem.

Maybe it's because I've made holes in the pads?

After all the pictures I have posted, you have to ask?

Why is the mess a problem?

Can't you just clean the drill bits and the PCB?

How do you repair a pad that has been ripped off by the toner that had melted on to the drill bit? As for the mess; my drill press is in the basement and the chemical are in the garage (first floor) and I am a little creaky in the bones.
Did I not plainly state this happened when I first started making PCB?


I've never tried it but I imagine that it'll be hard to remove.

Her is what I wrote, do you want a more detailed explanation, most understood it perfectly.:
"Why not use copy paper?
Copy paper for DIY toner transfer?????????
How in the world is that done? (Remember you read it here first)
Just put two (2) coats of glue on it, like I described in a previous post." If I remember correctly it was directed to a post that asked if my glue method wold work on a more transparent paper for use in makine DS boards.


What scrubbing?
Are you referring to a paragraph I plainly marked as parody?
QUOTE]

In the future, please take the time to read and understand my post('s) before answering!
 
Last edited:
FREE boards from PULSAR

After seeing my low supply of transfer paper I got on the Pulsar site to order and lo and behold they are giving away FREE pc boards.
2 - 5x6 or larger boards If ordering they provide shipping else you pay shipping (still cheaper than elsewhere)
AND then got a call from Frank about my order which got messed up or ??
sending my order of green TRF, transfer sheets, several boards AND for FREE = a supply of white foil for silkscreen layer.
ANYBODY who complains about PULSAR materials etc. apparently hasn't even bought from them. This will be my fourth order and each time I call I get the same friendly treatment and lots of info, tips etc just by asking.
One of the few companies who actually treat customers as human beings, not just a source of income.
I give PULSAR 5 stars outa 5 XXXXX
 
I know this is an old thread, but I thought I'd add my efforts with dextrin coated paper to the list. You can make dextrin by baking (UK cornflour, US cornstarch) in the oven at 200C for 2 hours, stirring regularly. Mix it with water and you get a glue very much like you find on envelopes. In fact, if you taste it, it tastes like licking envelopes tastes like.

Anyway, the recipes on the net say you should spray the paper with silicone waterproofing spray first to stop it wrinkling up. I don't have and can't afford that stuff, so I soaked the paper with water and brushed it down on to the kitchen worktop, much like we did in school art lessons to stretch the paper and stop it wrinkling. It works tolerably well. Next I tried to appy a nice even coat of the dextrin glue. I tried a silicone pastry brush, a traditional pastry brush, and a squeegee. The squeegee isn't very even, though I managed with it for the first sheet. For subsequent sheets I used the traditional pastry brush.

I used some thin paper, I don't know what sort it is - just it's quite old - might have been used for drafting originally.

Being impatient (and wanting to free up the kitchen worktop) I used a hair drier to dry the first sheet. The sheet was a bit wibbly wobbly, but this was easily ironed out. I printed the design on the sheet, ironed it onto the pcb, put it in hot water, paper all but floated off - amazing!

So as far as DIY transfer papers go, for me this The Way.

Having other issues now like toner not sticking to the copper adequately, porous transfer etc, lots of retouching required, but I'm sure I will resolve those.
 

Attachments

  • Inductance-Capacitance+Meter-PCB.jpg
    Inductance-Capacitance+Meter-PCB.jpg
    415.2 KB · Views: 273
Status
Not open for further replies.

New Articles From Microcontroller Tips

Back
Top