Electro Tech is an online community (with over 170,000 members) who enjoy talking about and building electronic circuits, projects and gadgets. To participate you need to register. Registration is free. Click here to register now.
Welcome to our site! Electro Tech is an online community (with over 170,000 members) who enjoy talking about and building electronic circuits, projects and gadgets. To participate you need to register. Registration is free. Click here to register now.
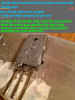
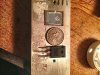
If possible to get the numbers from these transistors between the pcb and part without removing them? or is that glue in the way that I see on them thus far. (the red dots)
Also the pad info does seem to state multiple transistor sizes. I just don't want you to get them, then have a dime size vs a quarter coin size requirement. TO-218, TO-220, TO-247 listed for the Berqquist brand, all tho they are not mica but silicone rubber and silicone elastomer.
If it's getting a bit late, can pick up later. The only parts left to figure out are the thermal plates, and the size of those driver transistors, to get the right size plate, larger plate would be ok, can be trimmed or just installed oversized, too small is what am wanting to avoid, would be as if no plate were there at all around its edges.
If the glue is too well applied to those transistors (it may hold them at the board), then a large size thermal plate can be considered, however, if they have all ready been ordered, those pads mentioned earlier can work, it will just be that the thermal pad potentially being smaller will still insulate the transistor from the heat sink, but have the edges exposed, non conductive thermal grease can be used to fill in as with the plates as is, resulting in the plate suspending the transistor from the heat sink, and the grease being able to stay at the edges via the thermal pad acting as a spacer for the center upper portion of the transistors exposed plate on the back of it.
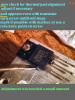
Those are plastic, or a very thin Mica plate, the stress marks indicate thin mica. and no, I would not advise the reuse of them. because those stress points can brake during snugging of the screw on assembly and allow potential a short even with non conductive grease, as the transistors heat up, that grease becomes malleable (soft like a fluid gel -pliable) and can ooze away allowing a metal to metal contact short. And the broken one, did it come off like that? or was it stressed then broke rather easily after removal?
As for the wire used, that will be ok, as it only enables the field produced by the board in operation to be absorbed so to speak to a close by return point. That large block of aluminum would act as an overgrown antenna, holding a low charge, especially from being any where near that speakers magnet, and the pcb being so close, this field would play havoc on near by components that were sensitive to it. Transistors primarily in general have an amazingly low static transfer rate, until energized or connected in a shielded manner. The manufacturers method is just to use a gnd plane for return. As long as the leads reach, and able to be installed, and are not too long, as this could bunch up between the board and sink, it will work fine. As for tinning the ring leads, would help to increase the transfer, tho not really needed. As for tinning to help then hold together better, that would help, however I have not seen if those leads (Oring) would be kept away from the other contacts on the power pcb when everything is assembled together.
If possible to get the numbers from these transistors between the pcb and part without removing them? or is that glue in the way that I see on them thus far. (the red dots)
That's just glue // My mistake, It's not just glue..
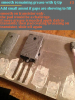
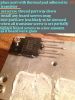
I inspected these big flat transistors, and can't find any numbers on them. But I did get a measurement with my little metal ruler. I'll upload the pics
Which is roughly:
Transistor Width 20/32 - 15.875 mm
Transistor Height 25/32 - 19.84375 mm
If the glue is too well applied to those transistors (it may hold them at the board), then a large size thermal plate can be considered, however, if they have all ready been ordered, those pads mentioned earlier can work, it will just be that the thermal pad potentially being smaller will still insulate the transistor from the heat sink, but have the edges exposed, non conductive thermal grease can be used to fill in as with the plates as is, resulting in the plate suspending the transistor from the heat sink, and the grease being able to stay at the edges via the thermal pad acting as a spacer for the center upper portion of the transistors exposed plate on the back of it.
My how does Digi like their grease, with a vice grip it would seem on the prices. Mg chemicals has typically low conductive via the lithium containing some carbon and suspended metals in their formulas. They do insulate and reduce conduction, however, that type of grease is best suited for lubrication methods that need metal friction reduced overall rather than conductive operation. Something like this as a reference https://www.newegg.com/Product/Product.aspx?Item=N82E16835186038
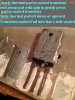
However I am not wanting to add a third party to this, seems like it's an adding up venue, why not one shop fore every thing... that would seem like good logistics, however what sells most is whats typically what's kept most in stock. and the 4 gram tube can be all it needs, a thin amount per transistor should all most deplete the whole tube. I'm going to make some images of a paste I have on a transistor to give an idea. however, this past I have is conductive, however the only example that I can give. (mainly all my transistors that are sinked are independent from any other including common or positive leads ... except for the connectors). Other notes, radio shack may have the grease needed, as to knowing if it is truly non conductive, they may not have a clue. Getting the images up using a monster 1500 Volt power BJT transistor.
this is the closest yet decent thermal pad to find, datasheet states it does not have a melting point? (area of weakness on the entire surface of pad, some are near the edges or hole cut in them) now that's interesting. And radiation resistant... Ok.... https://www.mouser.com/ProductDetail/Aavid-Thermalloy/43-77-20G
As for the grease, that newegg, unless Rshack would happen to have some that is what is said it is. I have gotten things in the past and had to learn the hard way about a shop like shack that sells for whom ever, then wonder why products are flopping like fish in bagel (Lox). coarse the Lox is going in the other direction . Other than that, the parts list are assembled here... well, there here that's the important part. Compile a list and confirm them? and also when needed I have put together a small sort of small tutorial, it all depends on interpretation of what's being viewed. any questions, please do ask. The link for the thermal pad, those are the decent ones over the others and are a close fit for TO-218 Transistors that resemble a closeness to those drivers. None are needed for those two smaller transistors, thin grease on their backs will work, not 100% needed on those, but vs. uneven contact, humidity, and alignment, the grease does fill in any gaps in most cases, so it would be an ideal to grease the large drivers first, then any leftover to those 2 standouts, that are BJT TO-220 types btw.
Tutorial, please note, many have different methods for this kind of method of applying thermal compounds and would state that if pads were used then the grease is not necessary to use, corroded face to sink, is my response in many cases. (Transistors are sometimes polished by the manufacturers to help them seat flat to a heat sink, this has at times removed some of the protective coating on the part resulting in corrosion eventually, heat sinks are cold then the transistors heat up, condensation can occur between the two parts, even in some cases when they were not polished) Well here are the images, also it gets rather stagnant here (where I'm at) sometimes, I do love to irritate the neighbours tho.
Ok first this is for when the parts are acquired for the thermal parts on the transistor greasing. here we go, remember I said i get stagnantly board here. hehe
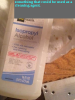
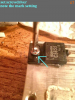
First a Solvent, clean evaporating is preferable. Also you need not remove the transistors for this. I just used one all ready off for the example.
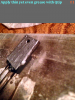
Now some cleaning utensils.. a Qtip or a paper towel. (during the image placements something happened) small mess.
an attempt to continue.
The final ones. Also the isopropyl alcohol is not to be saturated onto the parts, just a small amount. The sink on the other hand can be cleaned where the transistors seat with this or something else equivalent that evaporates given time. usually quick for preference. Also for ease of use, if you do use Isopropyl, needs to be at least 70% and up pure. this 50% i use is for gentle removal of some dirt from resistors and other parts with a heat source not too far off. For air evaporating. It'sa... it'sa hair dryer ok..
Also by the way, the transistor screw should be loose a bit, and if the board has been installed, (which it should by now) the adjustment if necessary for the thermal pad (the one's that get used), need to slightly lift the transistor to allow the pad to move, However if the pad is of a soft material, it is best to try to align it on the transistor before installation and maintain an eye on aspect during so, screws into transistors first, loose, then the pcb board screws can be installed and (the old mechanics word for just a little torque then was snug) odd I could emagine. Continuing, then the thermal pad checked, then the transistor screws torqued lightly, again the definition of how much is lightly and or including torque specs would be of little help, (have a torque drive screwdriver?) A little info on some aspect via an infineon view point. https://www.infineon.com/dgdl/Infin...n.pdf?fileId=db3a3043429a38690142a3a1f142107f
Also reference as to a size for the pad, needs a new caliper here. I wasn't paying attention and the 60Watt iron was too close and said hello to the plastic caliper.. melted, quite well actually. Only thing I could find universally is a coin. Hope it helps on an aspect of the size that would best fit those switching transistors.
That's just glue // My mistake, It's not just glue..
I inspected these big flat transistors, and can't find any numbers on them. But I did get a measurement with my little metal ruler. I'll upload the pics
The width of the thermal plate will be the ruling factor on the replacement plates. the length is the latter only as the transistor metal exposed tab ends near the base, so for the case of best heat transfer as the thermal pad is a part between the transistor and the housing would need to cover as much as possible so that the heat can transfer evenly across the transistor to heat sink, just without any sparks from electrical contact. The Mouser Aavid Thermalloy has better in thickness being less than the Digi, Keystone pad. overall the Aavid is a better of the two listed thus far, not only is it thinner, the material shows better strength in operation points. However it is an Elastomer based pad. that Elastomer material can be used, it just has a bit of a sponge like quality to it when stretched, tho not going to be a problem when installed on transistor itself with grease, then applied to the heat sink, (think of, dropping an engine into a car when it needs to be applied straight into the engine compartment) So I doubt that the pads would have to deal with any slide stress that would cause this when heated under operation.
As for the width, those mica that were removed are quite a bit wider than the transistor, and not all the width is necessary. Main area to observe for a thermal pad would be the top part of the Device that has a T shape to the heat transfer plate.
the Mousers Thermalloy type shows 2.925mm over the 15.875mm width at transistor. total 18.8mm pad width.
The Thermalloy Height, 3.394mm over the 19.846mm height at transistor. total 23.24mm pad height.
I went over by .001 on the transistors height.
even with material differences pad per pad, I doubt that would vary much. the thinner the thermal plate the better, however the grease tends to go in the other direction on heat transfer by small amounts. Just used for thermal contact adhesive, and for filling in the gaps between parts. It was used prior on that amp, so the mica being thinner (the worn out removed plates) of the lot looked at thus far. the temperature difference based on how the amp is driven (how loud) would be much thermal difference. so thus far the Mouser thermalloy looks the part that fits.
If my measurements are off, I'm not at quality with math very well, however, nice 32nd/64ths caliper ruler.
This is when the shipping costs are ridiculous! Shipping cost way more than the parts.. I'll call them in the AM to see if I could intercept
and add on to that order the Thermalloy....
For resistors/transistor I'm ordering 2 each just in case. I hadn't finalized what grease I'm getting of the few we discussed yet though.
This site uses cookies to help personalise content, tailor your experience and to keep you logged in if you register.
By continuing to use this site, you are consenting to our use of cookies.


") // My mistake, It's not just glue..
// My mistake, It's not just glue.. . Other than that, the parts list are assembled here... well, there here that's the important part. Compile a list and confirm them? and also when needed I have put together a small sort of small tutorial, it all depends on interpretation of what's being viewed. any questions, please do ask. The link for the thermal pad, those are the decent ones over the others and are a close fit for TO-218 Transistors that resemble a closeness to those drivers. None are needed for those two smaller transistors, thin grease on their backs will work, not 100% needed on those, but vs. uneven contact, humidity, and alignment, the grease does fill in any gaps in most cases, so it would be an ideal to grease the large drivers first, then any leftover to those 2 standouts, that are BJT TO-220 types btw.
 a Qtip or a paper towel. (during the image placements something happened) small mess.