Electro Tech is an online community (with over 170,000 members) who enjoy talking about and building electronic circuits, projects and gadgets. To participate you need to register. Registration is free. Click here to register now.
Welcome to our site! Electro Tech is an online community (with over 170,000 members) who enjoy talking about and building electronic circuits, projects and gadgets. To participate you need to register. Registration is free. Click here to register now.
I have used prepasted wallpaper. Print on the paste side and soak it off after ironing.
I don't use an iron, I clamp the PC board between two pieces of glass with paper handkerchief over the PNP blue. I use a thin piece of wood to keep the metal spring clamp off the glass. I put it in the oven at 420 degrees F for about 10 minutes. I always have to repair the result, some of the pattern does not stick. I use finger nail polish thinned with acetone for the repair.
It must hold on to the printed toner. Some things I have tried like parchment paper and alu foil are too slick, it is difficult to transfer the image prior to it falling apart.
It must release the toner to the PCB when the toner is reheated. Copy paper is very bad because the toner finds it way between the fibers and the two are more or less combined. You get fuzzy traces with pin holes.
Slick paper uses clay that prevents the toner from soaking in. The clay may also help release the paper.
I use PulsarProFx paper. It is coated with a starch that holds the toner well and turns to slime when wet. I about a minute the paper floats off the PCB.
This paper can be hard to find in some places but it you can get it it is very good. Very fine lines. Touchup is rare.
On the laser/picture paper side, it is really just practice. Good clean copper, plenty of heat to move the toner to the copper, no rush on soaking/removing the paper. That always works well for me. Having a fine point Sharpie does not hurt either if in a rush .
I agree that you can make good boards without Pulsar or P&P. I have no experiance with P&P but I know it is easier to make more detailed boards with Pulsar sytem of paper and foil.
What you need depends on what sort of PCBs you are making and how much fiddling you are willing to do to get it right.
Regardless of what one uses for paper a laminator is a good step in the right direction.
I only got one or two barely usable boards with an iron and various papers. 5-10 minutes is a lot of work for a maybe. Found a surplus site with a $25 4" laminator, and while waiting for delivery found the Pulsar paper site. Both arrived same day, few hours a part. I'm etching boards in about the same time I was waiting for the iron to heat up.
Only problem with the laminator is that you can only use thin board, but probably not hard to modify. I like the thin board better anyway, since I work in low voltage/current, and it cuts easy in a paper cutter. Yeah, guess I'm kind of lazy, but I want to be soldering.
A drill press is also a good investment. So useful for many things, other than drilling dozens of PCB holes, without breaking the bit. $40 for an 8" benchtop, was well worth every penny.
The big change for me was the laminator. I was getting results with an iron, but the laminator gave more constant good results.
I push thicker boards - 1/16th " - through the laminator, but really like the thin 1/64" boards because not only can I cut them with scissors, but can drill them with a pin vice very quickly and don't get the parallax error that I sometimes do with a drill press.
The pulsar paper was also an improvement; it only takes seconds, rather than minutes, to remove the backing paper.
Ha! Me too. Picture paper and I still get excellent quality boards. I've been trying out ammonium pursulphate and I'm not very happy with that. Will move back to FC.
I only got one or two barely usable boards with an iron and various papers. 5-10 minutes is a lot of work for a maybe. Found a surplus site with a $25 4" laminator, and while waiting for delivery found the Pulsar paper site. Both arrived same day, few hours a part. I'm etching boards in about the same time I was waiting for the iron to heat up.
Only problem with the laminator is that you can only use thin board, but probably not hard to modify. I like the thin board better anyway, since I work in low voltage/current, and it cuts easy in a paper cutter. Yeah, guess I'm kind of lazy, but I want to be soldering.
A drill press is also a good investment. So useful for many things, other than drilling dozens of PCB holes, without breaking the bit. $40 for an 8" benchtop, was well worth every penny.
Ha! Me too. Picture paper and I still get excellent quality boards. I've been trying out ammonium pursulphate and I'm not very happy with that. Will move back to FC.
**broken link removed**
What do you want a photo of, the issues with the AP, or just boards I've made with the picture paper?
The issues I've had with AP is the length of time it takes. I'm guessing that might be directly related to the second issue I have with it, which it does not give me crisp edges to the etched lines. I get a bit of pock marked edging. It's still very useable, but doesn't create nice edged lines like I'm used to.
This one was etched with AP. If you want to see the detail of the edging I'm talking about, I can break out the macro lens and show you the traces.
**broken link removed**
I would consider this a regular FC board that I make:
**broken link removed**
If you are talking about rocklore.com the problem is that our ISP forced us to move to cable modem and the static IP address changed (and now is $10 month). It will take a while for the IP address to make its way to all the name servers. And whatever other problems pop up.
I see what you mean. I would be unhappy too.
Is you AP etchan warm enough ?
Some time when I am etching a few of the same design I will run some with SP and some FE and see if I can tell which is which.
As SP gets older/weaker it takes longer to etch. It seems that this leads to more pinholes but it could be that I am getting the etchant too hot. I need to build a etching tank with heat control to be sure. Of late I have been heating it in the microwave.
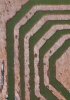
What do you want a photo of, the issues with the AP, or just boards I've made with the picture paper?
The issues I've had with AP is the length of time it takes. I'm guessing that might be directly related to the second issue I have with it, which it does not give me crisp edges to the etched lines. I get a bit of pock marked edging. It's still very useable, but doesn't create nice edged lines like I'm used to.
This one was etched with AP. If you want to see the detail of the edging I'm talking about, I can break out the macro lens and show you the traces.
**broken link removed**
I would consider this a regular FC board that I make:
**broken link removed**
I'm a former Electronics Tech (30 years) and I worked for Sears Product Services. My Dad was a Tech, and I grew up in a TV repair shop.
When I was in my teens, I started reading Popular Electronics, and at nineteen, I began building some of the projects. I started off breadboarding, then discovered Press N Peel in the early 1990's, and have stuck to that method, having gotten good results.
I've been writing e-commerce software for a number of years now, and haven't picked up a soldering iron in several years. Last week, while cleaning our utility room, I stumbled on a box that had a few of my old projects in it:
**broken link removed**
The one on the left is the famous "Bio-Stimulator." I put the round nuts on the side (an improvement, IMHO), as you can more easily touch it to the skin that way. The pot to adjust the level is on the front, also easier to get your finger or thumb on. The "Protect 2 Audio Sentry" on the right is my own design and build.
**broken link removed**
**broken link removed**
The 2 pictures above are of the famous "Powered Subwoofer" that I made in 1996. The board you see wasn't straight, so I etched another and used it, but I kept the board. Even then, Press-N-Peel did a pretty fair job. The 2nd picture shows the completed project. I was almost faced with building a speaker enclosure, when a customer brought in an Advent for repair. The tech just replaced the unit, and threw the Advent out. I rescued it from the dumpster, removed its innards, and built the project in that. I used it for several years, it has great sound. In fact, it still works.
As to etching, the most important step is preparation: clean the board. I used comet cleanser, and made sure to rinse it throughly.
Heating the etchant solution is a must.
Finding the box is what prompted me to find this site, as I Googled Popular Electronics projects, and up it came in the results.
The box I found was also full of parts and about 90 Popular Electronics/Electronics Now/Electronic Gadgets magazines. Also, my ESR meter, scope, several DVM's and my trusty old Simpson 360. A real treasure trove! So, this find has gotten me interested again, and I just sent away for fresh circuit boards, etc allelectronics.com and Digi-Key, and 25 special project boxes from Polycase - Plastic Electronic Enclosures. I'm putting my electronics lab back up, and am looking forward to getting back into building things.
If you don't mind me asking, what program do you use to layout your boards?
This site uses cookies to help personalise content, tailor your experience and to keep you logged in if you register.
By continuing to use this site, you are consenting to our use of cookies.