Continue to Site

Welcome to our site!

Electro Tech is an online community (with over 170,000 members) who enjoy talking about and building electronic circuits, projects and gadgets. To participate you need to register. Registration is free. Click here to register now.

  • Welcome to our site! Electro Tech is an online community (with over 170,000 members) who enjoy talking about and building electronic circuits, projects and gadgets. To participate you need to register. Registration is free. Click here to register now.

PIC PWM outputs?

Status
Not open for further replies.
Here's a code that you can put a led with a resistor on any of the PORTB bits. I put it on bit3 like you are already using. In the code there is a place that says
movlw 0x44
movwf runn
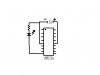
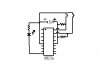
If you change this value the time it takes to fade changes. As is it fades out a few times a second. Something I noticed when writing this code is that leds do not light up in a linear fashion. You have to have an exponential increase in the PWM to get an even fade. This code if really long for what it does, but I hope it's easy to follow and does what you want. I also put a circuit that shows how to put the led. The short leg/the flat side is the - side.

Code:
;andy fade some lights


	list P=16f628a
#include <p16f628a.inc>
	__config _INTRC_OSC_NOCLKOUT & _BODEN_OFF & _WDT_OFF & _PWRTE_ON & _MCLRE_OFF & _CP_OFF & _CP_OFF 
	ERRORLEVEL -302
	
	cblock		20h
	BH,BL,wait,del_clk1,del_clk2,run,runn
	endc
	
	bsf	STATUS,RP0		;bank 1
	movlw	0x00
	movwf	TRISB		;make all outputs
	bcf	STATUS,RP0
	
	movlw	0x07		;turn off comparitors
	movwf	CMCON
	
	movlw	0x44			;adjustment for speed of fade
	movwf	runn
	
start
	call	firstt
	call	secondd
	call	thirdd
	call	fourthh
	call	fifthh
	call	sixthh
	call	seventhh
	call	eighthh
	call	ninthh
	call	tenthh
	call	ninthh
	call	eighthh
	call	seventhh
	call	sixthh
	call	fifthh
	call	fourthh
	call	thirdd
	call	secondd
	goto	start

firstt
	movf	runn,0
	movwf	run
first
	movlw	0xff
	movwf	PORTB		;turn on leds
	movlw	0x01		;set on time of duty cycle
	movwf	BH
loop
	decfsz	BH,1		;count down the on time
	goto	loop
	movlw	0x00		;turn leds off
	movwf	PORTB
	movlw	0x01		;set off time of duty cycle
	movwf	BH
loop2
	incfsz	BH,1		;count up to the off time
	goto	loop2
	decfsz	run,1	;run the PWM for a moment
	goto	first
	return
	
secondd
	movf	runn,0
	movwf	run	
second
	movlw	0xff
	movwf	PORTB		;turn on leds
	movlw	0x03		;set on time of duty cycle
	movwf	BH
loopa
	decfsz	BH,1		;count down the on time
	goto	loopa
	movlw	0x00		;turn leds off
	movwf	PORTB
	movlw	0x03		;set off time of duty cycle
	movwf	BH
loop2a
	incfsz	BH,1		;count up to the off time
	goto	loop2a
	decfsz	run,1	;run the PWM for a moment
	goto	second
	return


thirdd
	movf	runn,0
	movwf	run
third
	movlw	0xff
	movwf	PORTB		;turn on leds
	movlw	0x05		;set on time of duty cycle
	movwf	BH
loopb
	decfsz	BH,1		;count down the on time
	goto	loopb
	movlw	0x00		;turn leds off
	movwf	PORTB
	movlw	0x05		;set off time of duty cycle
	movwf	BH
loop2b
	incfsz	BH,1		;count up to the off time
	goto	loop2b
	decfsz	run,1	;run the PWM for a moment
	goto	third
	return


fourthh
	movf	runn,0
	movwf	run
fourth
	movlw	0xff
	movwf	PORTB		;turn on leds
	movlw	0x07		;set on time of duty cycle
	movwf	BH
loopc
	decfsz	BH,1		;count down the on time
	goto	loopc
	movlw	0x00		;turn leds off
	movwf	PORTB
	movlw	0x07		;set off time of duty cycle
	movwf	BH
loop2c
	incfsz	BH,1		;count up to the off time
	goto	loop2c
	decfsz	run,1	;run the PWM for a moment
	goto	fourth
	return

	
fifthh
	movf	runn,0
	movwf	run
fifth
	movlw	0xff
	movwf	PORTB		;turn on leds		
	movlw	0x09		;set on time of duty cycle
	movwf	BH

loopd
	decfsz	BH,1		;count down the on time
	goto	loopd
	movlw	0x00		;turn leds off
	movwf	PORTB
	movlw	0x09		;set off time of duty cycle
	movwf	BH
loop2d
	incfsz	BH,1		;count up to the off time
	goto	loop2d
	decfsz	run,1	;run the PWM for a moment
	goto	fifth
	return


sixthh
	movf	runn,0
	movwf	run
sixth
	movlw	0xff
	movwf	PORTB		;turn on leds
	movlw	0x11		;set on time of duty cycle
	movwf	BH

loope
	decfsz	BH,1		;count down the on time
	goto	loope
	movlw	0x00		;turn leds off
	movwf	PORTB
	movlw	0x11		;set off time of duty cycle
	movwf	BH
loop2e
	incfsz	BH,1		;count up to the off time
	goto	loop2e
	decfsz	run,1		;run the PWM for a moment
	goto	sixth
	return
	
	
seventhh
	movf	runn,0
	movwf	run
seventh
	movlw	0xff
	movwf	PORTB
	movlw	0x17		;set on time of duty cycle
	movwf	BH
loopf
	decfsz	BH,1		;count down the on time
	goto	loopf
	movlw	0x00		;turn leds off
	movwf	PORTB
	movlw	0x17		;set off time of duty cycle
	movwf	BH
loop2f
	incfsz	BH,1		;count up to the off time
	goto	loop2f
	decfsz	run,1	;run the PWM for a moment
	goto	seventh
	return
	

eighthh
	movf	runn,0
	movwf	run
eighth
	movlw	0xff
	movwf	PORTB
	movlw	0x25		;set on time of duty cycle
	movwf	BH
loopg
	decfsz	BH,1		;count down the on time
	goto	loopg
	movlw	0x00		;turn leds off
	movwf	PORTB
	movlw	0x25		;set off time of duty cycle
	movwf	BH
loop2g
	incfsz	BH,1		;count up to the off time
	goto	loop2g
	decfsz	run,1	;run the PWM for a moment
	goto	eighth	
	return
	
	
ninthh
	movf	runn,0
	movwf	run
ninth
	movlw	0xff
	movwf	PORTB
	movlw	0x35		;set on time of duty cycle
	movwf	BH
looph
	decfsz	BH,1		;count down the on time
	goto	looph
	movlw	0x00		;turn leds off
	movwf	PORTB
	movlw	0x35		;set off time of duty cycle
	movwf	BH
loop2h
	incfsz	BH,1		;count up to the off time
	goto	loop2h
	decfsz	run,1	;run the PWM for a moment
	goto	ninth	
	return
	
	
tenthh
	movf	runn,0
	movwf	run
tenth
	movlw	0xff
	movwf	PORTB
	movlw	0x50		;set on time of duty cycle
	movwf	BH
loopi
	decfsz	BH,1		;count down the on time
	goto	loopi
	movlw	0x00		;turn leds off
	movwf	PORTB
	movlw	0x50		;set off time of duty cycle
	movwf	BH
loop2i
	incfsz	BH,1		;count up to the off time
	goto	loop2i
	decfsz	run,1	;run the PWM for a moment
	goto	tenth
	return
	end
 

Attachments

  • andylight.JPG
    andylight.JPG
    8.5 KB · Views: 289
jeremygaughan said:
Here's a code that you can put a led with a resistor on any of the PORTB bits.

Hey, thanks for the code. It does work. It dosn't seem to fade down as far as I want to go, but i'll play with it.

What needs to be changed in order to use a 16F628 code on a 16F628A? I thought the two were interchagable to a point?

bananasiong, I never bothered putting the scope on RB3. I guess i could try it though.
 
Hi andy whats your plan for smaller pics i'm using crude delay loops.working well.But the code gets bigger to do a smooth fade:D

BTW if you have problem with PIC's to do a PWM until you learn why not try with a simple opamp.

**broken link removed**
 
Andy1845c said:
What needs to be changed in order to use a 16F628 code on a 16F628A? I thought the two were interchagable to a point?

The only difference, as far as I'm aware, is the config value. As long as you use the labels then it will either throw up an error or will work correctly. This is why I hate seeing hex values in config statements.

The line posted earlier be Jeremy has a slight mistake,
Code:
__config _INTRC_OSC_NOCLKOUT & _BODEN_OFF & _WDT_OFF & _PWRTE_ON & _MCLRE_OFF & _[COLOR="Red"]DATA[/COLOR]_CP_OFF & _CP_OFF
I added the bit in red.

Also, the config above has both the internal oscillator and MCLR off. This is not recommended and you should probably turn MCLR on to prevent programming problems.

Mike.
Edit, I just noticed you posted the code above and your config is fine the way it is.
 
An observation.

It is good to know assembler and the details of the hardware but maybe it is better to start with a high leve language like C.

For a person who does not know how to program the task of learning hardware + assembler + logic of the task at hand, may be too much.

If you find that the C code I posted earlier is understandable, I could provide a working example for the 18F1320 (Microchip C18 compiler).
 
Andy the code to fade the lights doesn't fade the PWM all the way down to zero but that would be easy to fix. Change the "duty cycle values" The closer to zero the darker it gets. Remember when you change them that the leds light up in an exponential fashion.

The header of the code I used was taken from another code. When I got errors from MPLAB I changed them until they stopped showing errors. (pretty scientific huh) I'm still learning about how to write code properly. Actually I wanted the internal oscillator turned on but I don't understand the data sheet so well. I tried to fix the header. Hopefully someone who knows will double check it. Really I don't know the secret to get the code from one pic to the other is. What I did was steal a header from a code that I know works and then I copied it into my code. In the rest of the code and circuit I use the datasheet to make sure the ports and bits are all assigned properly and wired correctly.

Here is a new code with two switches. They change the speed of the fade when you turn them on (close the switch). Also I put a revised circuit. I hope this helps.

Code:
;andy fade some lights


	list P=16f628a
#include <p16f628a.inc>
	__config _INTOSC_OSC_NOCLKOUT & _BODEN_OFF & _WDT_OFF & _PWRTE_ON & _MCLRE_ON & _DATA_CP_OFF & _CP_OFF 
	ERRORLEVEL -302
	
	cblock		20h
	BH,BL,wait,del_clk1,del_clk2,run,runn
	endc
	
	bsf	STATUS,RP0		;bank 1
	movlw	0x00
	movwf	TRISB		;make all PORTB outputs
	movlw	0xff
	movwf	TRISA		;make all PORTA inputs
	bcf	STATUS,RP0
	
	movlw	0x07		;turn off comparitors
	movwf	CMCON


start
	movlw	0x44			;adjustment for speed of fade
	movwf	runn
	btfss	PORTA,0			;call to see if low, if low make fade slower
	call	slower
	btfss	PORTA,1			;call to see if low, if low make fade faster

	call	faster	
	call	firstt
	call	secondd
	call	thirdd
	call	fourthh
	call	fifthh
	call	sixthh
	call	seventhh
	call	eighthh
	call	ninthh
	call	tenthh
	call	ninthh
	call	eighthh
	call	seventhh
	call	sixthh
	call	fifthh
	call	fourthh
	call	thirdd
	call	secondd
	goto	start

firstt
	movf	runn,0
	movwf	run
first
	movlw	0xff
	movwf	PORTB		;turn on leds
	movlw	0x01		;set on time of duty cycle
	movwf	BH
loop
	decfsz	BH,1		;count down the on time
	goto	loop
	movlw	0x00		;turn leds off
	movwf	PORTB
	movlw	0x01		;set off time of duty cycle
	movwf	BH
loop2
	incfsz	BH,1		;count up to the off time
	goto	loop2
	decfsz	run,1	;run the PWM for a moment
	goto	first
	return
	
secondd
	movf	runn,0
	movwf	run	
second
	movlw	0xff
	movwf	PORTB		;turn on leds
	movlw	0x03		;set on time of duty cycle
	movwf	BH
loopa
	decfsz	BH,1		;count down the on time
	goto	loopa
	movlw	0x00		;turn leds off
	movwf	PORTB
	movlw	0x03		;set off time of duty cycle
	movwf	BH
loop2a
	incfsz	BH,1		;count up to the off time
	goto	loop2a
	decfsz	run,1	;run the PWM for a moment
	goto	second
	return


thirdd
	movf	runn,0
	movwf	run
third
	movlw	0xff
	movwf	PORTB		;turn on leds
	movlw	0x05		;set on time of duty cycle
	movwf	BH
loopb
	decfsz	BH,1		;count down the on time
	goto	loopb
	movlw	0x00		;turn leds off
	movwf	PORTB
	movlw	0x05		;set off time of duty cycle
	movwf	BH
loop2b
	incfsz	BH,1		;count up to the off time
	goto	loop2b
	decfsz	run,1	;run the PWM for a moment
	goto	third
	return


fourthh
	movf	runn,0
	movwf	run
fourth
	movlw	0xff
	movwf	PORTB		;turn on leds
	movlw	0x07		;set on time of duty cycle
	movwf	BH
loopc
	decfsz	BH,1		;count down the on time
	goto	loopc
	movlw	0x00		;turn leds off
	movwf	PORTB
	movlw	0x07		;set off time of duty cycle
	movwf	BH
loop2c
	incfsz	BH,1		;count up to the off time
	goto	loop2c
	decfsz	run,1	;run the PWM for a moment
	goto	fourth
	return

	
fifthh
	movf	runn,0
	movwf	run
fifth
	movlw	0xff
	movwf	PORTB		;turn on leds		
	movlw	0x09		;set on time of duty cycle
	movwf	BH

loopd
	decfsz	BH,1		;count down the on time
	goto	loopd
	movlw	0x00		;turn leds off
	movwf	PORTB
	movlw	0x09		;set off time of duty cycle
	movwf	BH
loop2d
	incfsz	BH,1		;count up to the off time
	goto	loop2d
	decfsz	run,1	;run the PWM for a moment
	goto	fifth
	return


sixthh
	movf	runn,0
	movwf	run
sixth
	movlw	0xff
	movwf	PORTB		;turn on leds
	movlw	0x11		;set on time of duty cycle
	movwf	BH

loope
	decfsz	BH,1		;count down the on time
	goto	loope
	movlw	0x00		;turn leds off
	movwf	PORTB
	movlw	0x11		;set off time of duty cycle
	movwf	BH
loop2e
	incfsz	BH,1		;count up to the off time
	goto	loop2e
	decfsz	run,1		;run the PWM for a moment
	goto	sixth
	return
	
	
seventhh
	movf	runn,0
	movwf	run
seventh
	movlw	0xff
	movwf	PORTB
	movlw	0x17		;set on time of duty cycle
	movwf	BH
loopf
	decfsz	BH,1		;count down the on time
	goto	loopf
	movlw	0x00		;turn leds off
	movwf	PORTB
	movlw	0x17		;set off time of duty cycle
	movwf	BH
loop2f
	incfsz	BH,1		;count up to the off time
	goto	loop2f
	decfsz	run,1	;run the PWM for a moment
	goto	seventh
	return
	

eighthh
	movf	runn,0
	movwf	run
eighth
	movlw	0xff
	movwf	PORTB
	movlw	0x25		;set on time of duty cycle
	movwf	BH
loopg
	decfsz	BH,1		;count down the on time
	goto	loopg
	movlw	0x00		;turn leds off
	movwf	PORTB
	movlw	0x25		;set off time of duty cycle
	movwf	BH
loop2g
	incfsz	BH,1		;count up to the off time
	goto	loop2g
	decfsz	run,1	;run the PWM for a moment
	goto	eighth	
	return
	
	
ninthh
	movf	runn,0
	movwf	run
ninth
	movlw	0xff
	movwf	PORTB
	movlw	0x35		;set on time of duty cycle
	movwf	BH
looph
	decfsz	BH,1		;count down the on time
	goto	looph
	movlw	0x00		;turn leds off
	movwf	PORTB
	movlw	0x35		;set off time of duty cycle
	movwf	BH
loop2h
	incfsz	BH,1		;count up to the off time
	goto	loop2h
	decfsz	run,1	;run the PWM for a moment
	goto	ninth	
	return
	
	
tenthh
	movf	runn,0
	movwf	run
tenth
	movlw	0xff
	movwf	PORTB
	movlw	0x50		;set on time of duty cycle
	movwf	BH
loopi
	decfsz	BH,1		;count down the on time
	goto	loopi
	movlw	0x00		;turn leds off
	movwf	PORTB
	movlw	0x50		;set off time of duty cycle
	movwf	BH
loop2i
	incfsz	BH,1		;count up to the off time
	goto	loop2i
	decfsz	run,1	;run the PWM for a moment
	goto	tenth
	return
	
slower
	movlw	0x88		;puts higher value in speed adjustment
	movwf	runn
	return
faster
	movlw	0x11		;puts lower value in speed adjustment
	movwf	runn
	return
	
	end
 

Attachments

  • andylight.JPG
    andylight.JPG
    10.8 KB · Views: 231
3v0 said:
It is good to know assembler and the details of the hardware but maybe it is better to start with a high leve language like C.

For a person who does not know how to program the task of learning hardware + assembler + logic of the task at hand, may be too much.
I very much disagree. That might be somewhat true with PC's, but when you're doing microcontrollers and the associated electronics you absolutely MUST know what's going on with the hardware, in detail. I believe that assembler should be the first language you learn, starting simple and working up to more complex things.

Once you've got a handle on that, only then should you start using higher level languages (if you even want to at that point).

I believe higher level languages tend to insulate you from the details somewhat, making understanding more difficult, especially for newbs.

Not only that, but they make porky, fat code that eats up memory and runs slow. :D
 
futz said:
I believe higher level languages tend to insulate you from the details somewhat, making understanding more difficult, especially for newbs.

You do not need to know much hardware detail to blink a LED, or even to do PWM. I makes understanding/learning easier......

In a more perfect world preople would learn a high level language first on a PC. Ater that we could have them learn assembly and processor details. But programing on the PC has lost the luster that programming uC's still have. You have to start where the interest is and currently that is uC's.

Start them with a high level language. Let them get good at blinking LEDs and such. You hold their hand, hide the details, and they get hooked. Over time you introduce more complex hardware and how it work.

At this point you can teach assembler. You teach assembler not because it is the worlds greatest programming language. You teach it because it is the best way to expose them to the nuts and bolts that you have been hidding.

The fact that compiled code takes more memory is not a big concern here. The inexpensive 18F family has memory to spare for learning.
 
Last edited:
3v0 said:
You do not need to know much hardware detail to blink a LED, or even to do PWM. I makes understanding/learning easier......

I would disagree, assembler forces understanding of the hardware on you, a high level language hides it from you - unless the compiler has specific commands for implementing hardware PWM you essentially copy the way you do it in assembler, and it's MUCH easier to implement if you have an understanding of assembler.

Do learning assembler first, you then have the hardware understanding required if you move to a high level language.

Where this advantage is starting to blur is the 18F series, simply because there's a free compiler available, and the application notes are mainly provided written in C. So in that case, I would suggest learning a little assembler on a 16F (so you understand PIC hardware), and probably go directly to C on the 18F.

Incidently, in Universities in the past you weren't allowed to use high level languages until you had mastered machine code, never mind assembler! :D
 
Nigel:

This is very real for me in that I am teaching young people to use uC's.

I understand why you feel the way you do about assembly. Anyone programming uC's needs a solid understanding of the hardware. But not when he/she/it is very green.

Do learning assembler first, you then have the hardware understanding required if you move to a high level language.
Learn a higher level language first, you then have the understanding of programming required to learn assembler.

From a structure and style viewpoint assembler is a bad first language.

As I tried to point out in my previous post it is far easier to teach people to program first. Then teach them about uC's. Learning machine language is easier if the student already understands basic flow control etc.

Current thinking in computer education is to start intro students at an abstract level. One school I know of starts with ALICE. At another first term students do not do any programming They spend there time learning logic and problem solving. Not sure but I think their first language is JAVA.

I think this is an effort to both bring people up to where they are ready to learn programming, and maybe weed out a few that would fail if they tried.

unless the compiler has specific commands for implementing hardware PWM you essentially copy the way you do it in assembler, and it's MUCH easier to implement if you have an understanding of assembler.
One can illustrate PWM in 10 or 12 lines of C code. The transistion to hardware PWM is all about setting up the hardware to do it. Can the student read a data sheet. As you said setting up the hardware is much the same. But the basic concept is better taught in a higher level language.
I would suggest learning a little assembler on a 16F (so you understand PIC hardware), and probably go directly to C on the 18F
Why learn a little assembler on a 16F then move to C and the 18F? Just use the 18F start to finish.

The truth is that I do not much care what people learn first. The point is that they learn. It is great that you help people with their assembly problems. Hats off.

Perspective has a lot to do with our differing viewpoints.
 
I think the difference here is that YOU are teaching them, so they have you to ask about the hardware, and presumably you teach them about it from a high level perspective?. This isn't an option without you there, the datasheets and application notes are all in assembler, and unless you understand a modicum of assembler a beginner is going to struggle.
 
IMO there is no easy answer to this debate.
If I started with the excellent 18F series I'd have a tough time going back to the 16F or worse 12bit 12F chips like the 12F509
I did start with the dirt simple 16C54, C was not a good option for that chip and CCS C was a bugfest back then. So I learned PIC assembler and it's not that difficult at all even with the 16F bank switching and small but powerful instruction set.
Since C supports inline code it's handy to know the basics, on the other hand the job market will expect C.
That said the 18F was designed with C in mind and the free SE C18 compiler is a real bargain, the extended instuction set and wider memory (16bit) makes assembler a breeze, (no hunting around for what bank that SFR is in).
Being able to read the code produced by the compiler will certainly come in handy for some.
 
We do need a strong background in software model of the micro. Also, there are only about 35 to 40 asm instructions to learn, and if timing is critical, asm is a must. But high level language such as C is always used in a real job. It is much easier and efficient.
The point I'm trying to make is, we should start with fundatmantal programming skill and logic. Like 3V0 said, if any one find that programming is not for him, then better move to different direction before wasting more time.
Learn asm then high level language. Because ultimately the students will have to find a job and high level language (C) is more important.
 
Hi guys

I'm new on here, searching for pwm info and I got enthralled in the debate about high level languages so I thought I'd add my two penne'th .... I grew up with computers starting back in 1976 by building the first UK micro, the Nascom I and then the Nascom II. These were designed around (in my opinion) the worlds finest uProcessor, the Z80, As supplied the Nascom had no high level languages and it had no assembler either, the machine was coded by entering the hex values required directly into memory, ahhh happy days, VERY happy days. As the Nascom became more popular then software came onto the market for it, I was too green at programming then to be able to code myself an assembler so I bought one as soon as one became available. This turned the world of programming around for me, it was so much easier ! After a few weeks I had completely grasped the how to code in Z80 assembler and I next turned my attentions to the 6800 having bought another UK kit computer, the 77/68, I did the same with this comp as I did with the Nascom. I then turned to the BBC B which had come onto the market in the early 80's and I set about learning 6809. The BBC B computer had been specifically designed for use in schools to teach the kids how to use comps and how to program, it had one of the best operating systems I've ever seen, loads of easily accessible routines within it for your machine code programs to access, it also had a built in assembler !

I write all this because we were meant to learn how to code in machine code, that's why the BBC B was built the way it was, for the schoolkids. I did learn BASIC at one point but the programs were so bloated and meant very little with respect to accessing the specially designed parts of the operating system and the hardware too. Another major point to consider, high level languages are simply programs not the code that drives the computer, that is machine code, you walk before you run, you write programs the way the processor was built to understand, in machine code, if you want to write bloated code then you learn that after you know how the code you are writing affects your hardware

High level languages were designed for professional coders to complete programs quickly and in separate modules, allowing lots of programmers to write one program between them. High level languages mean nothing with regards to the true operation of the computer. I have never learnt C, I don't see the point, it's more like pseudo code, a mix between machine code and BASIC, in fact C is so close to machine code it's better to go the whole hog and write your program in machine code anyway, saves you having to learn another language. It is much harder to learn a high level language when you don't understand what it's doing.

Just one more point, assembler isn't a language as some of the previous posts were suggesting, it's a method of programming, it's a program to convert nmemonics into machine code. What was actually meant would be PIC machine code (in that instance) although there are many types, in fact one for every different family of processors, you tend to find that the same code is used by manufacturers for the same family of processors, such as the Z8 family, right down to the Z80 which is downward compatible with the Z8 and like the 8080, the Z80 was designed to run 8080 code but has a lot more registers so it's downward compatible being able to run all 8080 but not the other way about because of all the extra registers.

I hope that helps and perhaps puts a cap on which method of coding to learn first, Acorn got it right by making the school computer very, very machine code friendly, machine code first, absolutely essential then if you have the inclination turn to medium and high level languages.

Keith <kayjayuk>
 
I have been googling for a while now, and I haven't been able to find what I am looking for.

What is a PWM output on a PIC? I assume any pic can do PWM, but one with a PWM output makes it easier?

I am looking for a a program to simply fade one I/O port on and off gently. I want to use it to control christmas lights and as a starting point in learning to use PWM.

I don't need it to be adjustible after programming (would be fun to add in the future though)

Is somthing like this somwhat simple, or does it take a fair amount of programming know how to make work? Maybe over my head at the moment?:eek:

All I have been able to find for the most part are motor contollers and color wash codes. And some are in C or Basic, and I only have a basic beginner knowledge of ASM.

Anyone have any advice or know where I could find a very basic PWM program to play with?
Hi andy, you might find some help here **broken link removed**
greetings
 
HI, Perhaps you will find help here **broken link removed** , this site is specially designed for beginners,several free circuit design downloads etc.
hope it is helpful
greetings
 
Last edited:
Status
Not open for further replies.

Latest threads

New Articles From Microcontroller Tips

Back
Top