Continue to Site

Welcome to our site!

Electro Tech is an online community (with over 170,000 members) who enjoy talking about and building electronic circuits, projects and gadgets. To participate you need to register. Registration is free. Click here to register now.

  • Welcome to our site! Electro Tech is an online community (with over 170,000 members) who enjoy talking about and building electronic circuits, projects and gadgets. To participate you need to register. Registration is free. Click here to register now.

How to decrease the output current and voltage from this DC to DC converter?

Status
Not open for further replies.
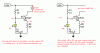
Look at the datasheet for an LM393 dual comparator. Its inputs are exactly the same as an LM358 dual opamp but its outputs have only a single NPN output transistor that can go low but there is nothing to make the output go high.
The datasheet shows an external resistor connected from the output to the positive supply to make the output go high. The minimum output current is only 4mA (for it to saturate fairly well) so calculate a suitable resistor value.
 
As audioguru, 4mA min output mean....is it hard to glow an LED indicator? Here is an exact circuit--
 

Attachments

  • Li-ion charger.gif
    Li-ion charger.gif
    36.2 KB · Views: 326
As audioguru, 4mA min output mean....is it hard to glow an LED indicator? Here is an exact circuit--
Each LM393 has a different amount of output current from 4mA to maybe 20mA. It is a low power dual comparator.
If the output of your LM393 is only 4mA then a dim old LED will be dim but a bright modern LED will be bright enough to see in daylight.

If you want more output current then use an ordinary opamp instead of this low power comparator.
 
Hi,

For a rough estimate you forget about the LED voltage and just use the resistor value and the supply voltage. If the supply is 10 volts and the resistor is 1k then you can estimate quickly 10/1000=10ma which is ab0ve 4ma. 10v/2000 ohms is 5ma, 10v/2500 ohms is 4ma. After you add the LED the current drops a little but that is usually ok.

For a high brightness LED you only need 1ma of current to get a good indicator out of it.

There's another issue however, and that is input offset drift with temperature. The LM358 is very good and the comparators usually are not as good. So if you expect somewhat large changes in temperature go with the LM358.
 
When the LED lights then the Lithium battery is only about 70% fully charged. A Lithium battery charger is supposed to indicate that the battery voltage has reached 4.20V (that this circuit does) AND the charging current has dropped to a low amount (that this circuit does not do).
 
Hi,
OK in overall I can use LM393 without modifying anything then.

AG, I will adjust 4.20V indicator (4.15V was for safe charging). And I feel to use voltage indicator hoping that there most be low charging current if battey has 4.20V, so I didn't wanted to use current indicator. I don't need VERY accurate charger so. Thank you MrAl and audioguru!
 
The circuit is designed for an opamp that has an output that can go high, not for a comparator.

An LM393 comparator needs a load resistor from its output to the positive supply to work properly in that circuit. The LED in series with its resistor makes a load that is disconnected when the LED is not turned on but it might work.
Adding a load resistor adds to the output current which is very low already without an added load resistor.

Look at www.batteryuniversity.com and read about charging a Lithium battery cell. When its voltage reaches 4.20V then it is still charging with normal charging current and it is not fully charged. Only when its charging current drops to a low amount then it is fully charged and the charger should be turned off. A charging loss of 30% is not accurate.
 
Hi,

Knowing some tricks of previous posts, I designed a simple NiCd charger (constant current). I tried to use very less and inexpensive parts and tried to get few more feature. Like I used a same LED for Vref which is 1.8V and same LED for power indicator too. Like in the attached schematic, when the load is connected, it's working very well as its calculation with 50mA constant current and LED is also glowing normally.

But when I disconnect the load then LED turns OFF fully. Wow, it's working as 'charging or load connected indicator' instead of just power indicator, so cool! :) How the amazing thing happened? Please tell the operation in simple.

EDIT: Now posted the design here in the 'Articles' section, with final touch and clear description: https://www.electro-tech-online.com...ant-current-limiter-with-load-indication.746/
 

Attachments

  • my design_amazing constant current.GIF
    my design_amazing constant current.GIF
    23.1 KB · Views: 247
Last edited:
The voltage reference, which is formed by the 1 kΩ resistor and the LED, can only produce a small current, as all of the current has to flow through the 1 kΩ resistor. If you try to take too much current, the output voltage will drop and the LED will go out.

The current through the 22 Ω resistor comes mainly from the load. There will be a small current from the voltage reference, which will be smaller than the load current by at least 100 times. If the load is disconnected, all the current in the 22 Ω resistor comes from the voltage reference. That is not capable of supplying enough current so the voltage across the 22 Ω resistor falls, as does the voltage from the voltage reference, and the LED goes out.
 
When the transistor has a 50mA load at its collector then its typical current gain of about 200 causes its base current to be only 0.25mA. Then the current in the 1k resistor is (5V - 1.8V)/1k = 3.2mA and the current in the LED is 3.2mA - 0.25mA= 2.95mA and it lights. Without a collector load the transistor is simply a base-emitter 0.7V diode and it uses all the 1k current so the LED does not light.
 
But to disable charger at end of charge, you need to detect drop in average current below a threshold after a delay time and then disable with an extra circuit for LiPo 3 stage charging. CC, CV then OFF
 
Hi,

Knowing some tricks of previous posts, I designed a simple NiCd charger (constant current). I tried to use very less and inexpensive parts and tried to get few more feature. Like I used a same LED for Vref which is 1.8V and same LED for power indicator too. Like in the attached schematic, when the load is connected, it's working very well as its calculation with 50mA constant current and LED is also glowing normally.

But when I disconnect the load then LED turns OFF fully. Wow, it's working as 'charging or load connected indicator' instead of just power indicator, so cool! :) How the amazing thing happened? Please tell the operation in simple.

Hi Willen,

Oh yes that's a cute idea. Usually when current has to be sensed by a transistor, a fraction of the the current is sent through the base emitter which turns the transistor on, then the collector is used to drive an LED or something like that. But with that idea you dont get the constant current as simply as that. With your idea, you get a reasonable constant current along with the LED indicator action.
You should get the equivalent of the Nobel Prize in ETO for this :)

I've only seen something like this once before in a different form, when back in the 1980's i needed an LED current source that had to be able to tolerate a wide range of voltages and maintain the same brightness and current for the life of the LED.
For that i used an op amp section that was unused on the board, and with the right feedback, the voltage of the LED regulates it's own current. This works because the LED voltage is relatively constant with a wide range of current levels, and we need a reference of some kind to regulate anything and that includes current.
I meant to post the circuit some time back but never got around to it.
It's just an op amp set up to measure current and provide that current to the LED, and using the voltage across the LED as the reference where you would normally use a separate reference. The LED may need a small bias current to make sure the circuit starts normally, so maybe a 1meg resistor from Vcc to anode, with the cathode grounded. Cant remember what size resistor i used back then.
I'll try to post the circuit soon.
 
Hi,

Knowing some tricks of previous posts, I designed a simple NiCd charger (constant current). I tried to use very less and inexpensive parts and tried to get few more feature. Like I used a same LED for Vref which is 1.8V and same LED for power indicator too. Like in the attached schematic, when the load is connected, it's working very well as its calculation with 50mA constant current and LED is also glowing normally.

But when I disconnect the load then LED turns OFF fully. Wow, it's working as 'charging or load connected indicator' instead of just power indicator, so cool! :) How the amazing thing happened? Please tell the operation in simple.

Good stuff

Here's an enhanced version for a LiPo cell charger


Two Yellows to handle more bias current which turn off when LiPo reaches low current charging or CV mode then Emitter voltage drops and Yellows turn off.

1W White LED indicate transition from CC mode to CV mode.
LiPo simulated as 100F cap with Zener and ESR.

Simulation link above speeded up 1 minute per second. Power curve shows charger charging 1.87W then turning on LED at 877mW when fully charged.
upload_2015-8-23_21-20-27.png


The 1W LED can be a flashlight LED, so when charger removed and switch closed it runs LED at 100mA then decays down to 50mA and further until below 3V to extend time. 100F cap also has ESR which drops < 20mohm as SoC goes up towards 100% at Full brightness on 1W LED. Max V on LiPo was 4.2x in simulation, depends on Beta slightly and 5V accuracy. Then must be manually turned off or put 10K across switch for float a little longer.
 
Last edited:
Status
Not open for further replies.

Latest threads

New Articles From Microcontroller Tips

Back
Top