With mobile devices becoming more and more commonplace in the modern world, it has become easier for the average person to write their own applications designed to run on smartphones and tablets. One of the most popular operating systems in the world is Android, an open-source platform built around the Linux kernel, currently developed by Google. The most common programming language used to create apps for Android devices is Java, which contains a massive collection of libraries designed specifically for this purpose. The following instructions are intended to get you started with creating an Android application using Java in the Eclipse IDE.
NOTE: You must have Java version 1.6 or higher installed on your machine.
Step 1: Install Eclipse, the Android SDK ("Software Development Kit"), and the ADT plugin. You can download Eclipse from the following link:
http://www.eclipse.org/downloads/
I recommend installing the one labeled "Eclipse IDE for Java EE Developers".
To install the SDK, go to this link and select the installer for your system under "SDK Tools Only":
https://developer.android.com/sdk/index.html#Other
Read and accept the agreement and download the installer. Once downloaded, run the .exe and follow the on-screen instructions. Make sure you take note of the installation directory. You will need this for Eclipse later. Finish the installation.
In Eclipse, go to Window-->Preferences-->Android (tab on the left-hand side) and in the SDK Location field enter the installation directory where you installed the SDK. Click "OK". You may get a message saying the SDK Platform Tools component is missing. If you do, go ahead and click "Open SDK Manager" and install all of the items under "Tools". Now would also be a good time to install the packages for the android device you'll be using. I am using Android 4.4.2, so I will check the box next to that item in the manager:

Click "Install packages", accept all licenses (make sure there are all green checkmarks) and click "Install".

Be aware that this installation might take a while. When complete, close the window.
Next, follow the instructions in this link to install the ADT plugin you’ll need to develop Android applications:
http://developer.android.com/sdk/installing/installing-adt.html
Once you have the IDE set up (Eclipse with the ADT the plugin installed), you may continue to Step 2.
Step 2: The first thing I suggest you do is create your virtual device. This is a virtual mobile device that you can use to test and debug your application without having to install it to your own phone or tablet.
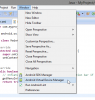
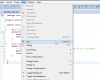
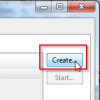
· Go to the “Window” menu at the top of the Eclipse pane and select “Android Virtual Device Manager”

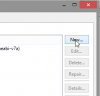
· The screen that appears will contain the list of any and all virtual devices you create. You can create new ones, edit existing ones, and remove them if necessary.

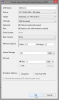
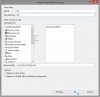
· Click "Create" and in the new window, set each field to what is shown in the image below. Eventually you’ll be able to make changes to this yourself to fit your needs, but for a basic project this is all you need.

· You now have a virtual device that you can use to run your program. The virtual device is an emulator that shows what an android phone screen would actually show if it was told to run your program.
Step 3: The next thing you’ll want to do is create a new project.
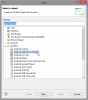
· Begin by going to the “File” menu and selecting “New” --> ”Other”.

· In the new window, click the arrow next to the “Android” folder to expand it, click “Android Application Project”, and then click “Next”.

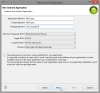
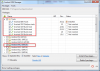
· Choose a name for your program/application. When you begin typing in a name, the “Project Name” and “Package Name” fields will automatically populate. When finished typing your application name, remove the “.example” from the Package Name field. This should leave you with something like “com.myProjectName”. Set the other fields to those shown in the image below. Click “Next”.

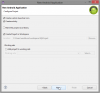
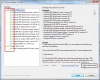
· Make sure the following checkboxes are checked in the next window, then click “Next”:

· Click “Next” though the rest of the dialogs without changing any settings. On the last one, I suggest leaving the pre-populated information and just clicking “Finish”.

· Once finished, you should have two new tabs in your Eclipse workspace. One titled “MainActivity.java” and another called “activity_main.xml”. The XML file is used to store your layout information, such as where buttons and text fields are located on the screen. The Java file is where most of your “working” code will be written.
Step 4: Now let’s review what you have:
· You have installed Eclipse and the ADT plugin to allow you to write code for Android applications and to run it on your PC.
· You have created a virtual device that you can run your code on for testing and debugging. It emulates the operation of an actual phone with an on-screen interactive image.
· You have created a simple project with two parts: A Java file and an XML file. You write code in the XML file to set up the screen layout, where buttons go, etc. You write code in the Java file to make the buttons, etc. actually do something. Below are what each of the tabs should look like:
MainActivity.java:

activity_main.xml:

· Now it’s time to move onto the fifth (and final) step of this tutorial.
Step 5: Let’s run the code that was automatically generated when you created the project.
· Go to the “Run” menu in the Eclipse window and select “Run”. Alternatively, you can press the Ctrl key along with F11.

· In the next window, select “Android Application” as the way to run your project. Click “OK”.
· If everything was set up correctly, your emulator should pop up on the screen. It will go through a boot cycle (just as with a real phone). It may seem to not be doing anything, but give it time. It takes a while to start up. When it does, you may have to “unlock” it (just click and drag the lock symbol out of the circle), and your program should run. You should see a new window pop up in the emulator that says “Hello world!”. This is the text defined in the XML layout file under “TextView”.

· Once you have that working, you’re free to edit the XML and Java files as you wish. Just a quick example, in order to create a Button, replace the “TextView” section in the XML file with the following code:
This creates a button that (line-by-line):
1. Is called “OK”
2. Matches its width with that of the screen
3. Adjusts its height only when necessary
4. Has its left side on the left of the screen
5. Has its top on the top of the screen
6. Has a label on it that says “OK”
When you create this in Eclipse, chances are the line saying "OK" will be underlined in yellow, signifying a warning. That is because Strings have to be defined in XML files as resources. To fix this, go down to the bottom left of the editor and select the tab that says “Graphical Layout”. This will show you what the screen will actually look like in the emulator. Now, chances are your “OK” button will have a small yellow triangle in the bottom right.

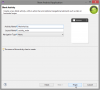
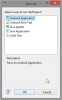
Right-click the button and select “Edit Text”. You should get a window that looks like the following. Click “New String”.

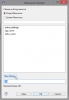
Populate the fields so they look like this image. The first field is the actual text that will be displayed. The second field is the identifier for the new string resource you are creating. When finished, click “OK”, then “OK” again:

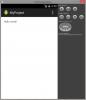
And now, when you run your project, you should have a button on your screen instead of the text saying “Hello world!”.

Please note that the button is not programmed to do anything yet. For that, code must be added to the Java file to make it do something. This is usually done by creating a button object in the main Java, and then attaching an OnClickListener method. But that is something for another tutorial.
This has been a basic tutorial discussing the process to create and run your first Android application. I hope it helps. More information about OnClickListeners can be found on the Oracle website and various other sources. Code examples (if searched correctly) can be found on sites like StackOverflow and others that you can find using Google. If you have any questions or comments regarding this article, feel free to contact me on the forums, or as a comment here.
I wish you the very best with your Android projects!
NOTE: You must have Java version 1.6 or higher installed on your machine.
Step 1: Install Eclipse, the Android SDK ("Software Development Kit"), and the ADT plugin. You can download Eclipse from the following link:
http://www.eclipse.org/downloads/
I recommend installing the one labeled "Eclipse IDE for Java EE Developers".
To install the SDK, go to this link and select the installer for your system under "SDK Tools Only":
https://developer.android.com/sdk/index.html#Other
Read and accept the agreement and download the installer. Once downloaded, run the .exe and follow the on-screen instructions. Make sure you take note of the installation directory. You will need this for Eclipse later. Finish the installation.
In Eclipse, go to Window-->Preferences-->Android (tab on the left-hand side) and in the SDK Location field enter the installation directory where you installed the SDK. Click "OK". You may get a message saying the SDK Platform Tools component is missing. If you do, go ahead and click "Open SDK Manager" and install all of the items under "Tools". Now would also be a good time to install the packages for the android device you'll be using. I am using Android 4.4.2, so I will check the box next to that item in the manager:
Click "Install packages", accept all licenses (make sure there are all green checkmarks) and click "Install".
Be aware that this installation might take a while. When complete, close the window.
Next, follow the instructions in this link to install the ADT plugin you’ll need to develop Android applications:
http://developer.android.com/sdk/installing/installing-adt.html
Once you have the IDE set up (Eclipse with the ADT the plugin installed), you may continue to Step 2.
Step 2: The first thing I suggest you do is create your virtual device. This is a virtual mobile device that you can use to test and debug your application without having to install it to your own phone or tablet.
· Go to the “Window” menu at the top of the Eclipse pane and select “Android Virtual Device Manager”
· The screen that appears will contain the list of any and all virtual devices you create. You can create new ones, edit existing ones, and remove them if necessary.
· Click "Create" and in the new window, set each field to what is shown in the image below. Eventually you’ll be able to make changes to this yourself to fit your needs, but for a basic project this is all you need.
· You now have a virtual device that you can use to run your program. The virtual device is an emulator that shows what an android phone screen would actually show if it was told to run your program.
Step 3: The next thing you’ll want to do is create a new project.
· Begin by going to the “File” menu and selecting “New” --> ”Other”.
· In the new window, click the arrow next to the “Android” folder to expand it, click “Android Application Project”, and then click “Next”.
· Choose a name for your program/application. When you begin typing in a name, the “Project Name” and “Package Name” fields will automatically populate. When finished typing your application name, remove the “.example” from the Package Name field. This should leave you with something like “com.myProjectName”. Set the other fields to those shown in the image below. Click “Next”.
· Make sure the following checkboxes are checked in the next window, then click “Next”:
· Click “Next” though the rest of the dialogs without changing any settings. On the last one, I suggest leaving the pre-populated information and just clicking “Finish”.
· Once finished, you should have two new tabs in your Eclipse workspace. One titled “MainActivity.java” and another called “activity_main.xml”. The XML file is used to store your layout information, such as where buttons and text fields are located on the screen. The Java file is where most of your “working” code will be written.
Step 4: Now let’s review what you have:
· You have installed Eclipse and the ADT plugin to allow you to write code for Android applications and to run it on your PC.
· You have created a virtual device that you can run your code on for testing and debugging. It emulates the operation of an actual phone with an on-screen interactive image.
· You have created a simple project with two parts: A Java file and an XML file. You write code in the XML file to set up the screen layout, where buttons go, etc. You write code in the Java file to make the buttons, etc. actually do something. Below are what each of the tabs should look like:
MainActivity.java:
activity_main.xml:
· Now it’s time to move onto the fifth (and final) step of this tutorial.
Step 5: Let’s run the code that was automatically generated when you created the project.
· Go to the “Run” menu in the Eclipse window and select “Run”. Alternatively, you can press the Ctrl key along with F11.
· In the next window, select “Android Application” as the way to run your project. Click “OK”.
· If everything was set up correctly, your emulator should pop up on the screen. It will go through a boot cycle (just as with a real phone). It may seem to not be doing anything, but give it time. It takes a while to start up. When it does, you may have to “unlock” it (just click and drag the lock symbol out of the circle), and your program should run. You should see a new window pop up in the emulator that says “Hello world!”. This is the text defined in the XML layout file under “TextView”.
· Once you have that working, you’re free to edit the XML and Java files as you wish. Just a quick example, in order to create a Button, replace the “TextView” section in the XML file with the following code:
Code:
<Button
        android:id="@+id/OK"
        android:layout_width="match_parent"
        android:layout_height="wrap_content"
        android:layout_alignParentLeft="true"
        android:layout_alignParentTop="true"
        android:text="OK" />
This creates a button that (line-by-line):
1. Is called “OK”
2. Matches its width with that of the screen
3. Adjusts its height only when necessary
4. Has its left side on the left of the screen
5. Has its top on the top of the screen
6. Has a label on it that says “OK”
When you create this in Eclipse, chances are the line saying "OK" will be underlined in yellow, signifying a warning. That is because Strings have to be defined in XML files as resources. To fix this, go down to the bottom left of the editor and select the tab that says “Graphical Layout”. This will show you what the screen will actually look like in the emulator. Now, chances are your “OK” button will have a small yellow triangle in the bottom right.
Right-click the button and select “Edit Text”. You should get a window that looks like the following. Click “New String”.
Populate the fields so they look like this image. The first field is the actual text that will be displayed. The second field is the identifier for the new string resource you are creating. When finished, click “OK”, then “OK” again:
And now, when you run your project, you should have a button on your screen instead of the text saying “Hello world!”.
Please note that the button is not programmed to do anything yet. For that, code must be added to the Java file to make it do something. This is usually done by creating a button object in the main Java, and then attaching an OnClickListener method. But that is something for another tutorial.
This has been a basic tutorial discussing the process to create and run your first Android application. I hope it helps. More information about OnClickListeners can be found on the Oracle website and various other sources. Code examples (if searched correctly) can be found on sites like StackOverflow and others that you can find using Google. If you have any questions or comments regarding this article, feel free to contact me on the forums, or as a comment here.
I wish you the very best with your Android projects!