A few months ago I was involved in helping another user creating and compiling a project using the MPLAB IDE from Microchip...
I Thought I would make this "Help File" for anyone wanting to do this for the first time..
First off you'll need to download and install the IDE from Microchips web site
http://www.microchip.com/stellent/i...E&nodeId=1406&dDocName=en019469&part=SW007002 You need the MPLAB IDE vX.XX its about 112MB.. ( I know, BIG download )
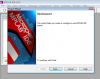
Whilst you install, there will be an option to install the latest PRO version of Hi-tech C compiler.... Select "Yes". The full version will work for a month or so, but! As this has a full install, all the pro libraries will continue to work in "Lite" mode.
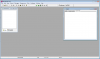
That done and out of the way. Double click your new MPLAB icon from the desktop, or the program menu if you didn't select that option. You will be presented with this.

Select "Project Wizard" in the project menu..

This is the first page in the project creation.

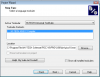
Select the processor from a HUGE list. I am using the pic16f628a. This chip is a direct replacement for the older pic16f84a, its cheaper and easier to get hold of. The main difference is the inclusion of a comparator module, a CCP module and a USART.. Oh and 1k more program rom.

Next second step is to choose your programming language. I personally use "C". but from here you can select MPASM as your toolsuite.

(Note.. If you have Hi-tech C for the pic18 series, it will select the correct tool to use)
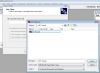
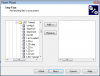
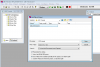
The third step is to select a folder and name for the new project.
Select "Browse" to do just that.
In this tutorial I'm creating a project called "LED Tutorial".
First create a new folder and rename this folder to your new projects name. ( You can call it whatever you like, but I find things easier to manage if the folder, workspace and project are all the same name).
Second type in the project name "LED Tutorial" and select "Save".

Step four will allow you to add several files... "C", "ASM", Headers etc.. to your project.

For this tutorial we just skip over this step as we will be creating a new code file.
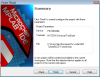
You are now done... The last screen shows that all your selections have been made and we are ready to proceed.

On selecting "Finish" we will be faced with our interface all ready to go.
The workspace now needs to be saved...( Automatically asks you to save the workspace )

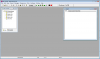
After this has been done you will be face with an empty project... The processor selected is displayed in the bottom left on the "Status bar" along with working register and flag register statuses

OK!! Lets create the program to toggle an LED on and off (Boring I know, but we need to start somewhere ).
The first thing we need to do is open a new file..
Under the "File Menu" is a "New" graphical icon. Select this.

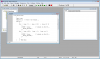
This will open a new window titled "Untitled*"... Type in a program. As I already mentioned I'm using C. This is a sample program to get us started.

Notice there is no syntax highlighting.. This is because the file isn't recognized as a C program yet!
If we save the file as a C file it will have this syntax highlighting making it easier to read.
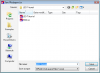
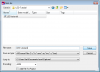
Go to the "File Menu" and select "Save As".
At this point you need to make sure you select the correct directory. Place the new file in the workspace directory as I have done here.

Once you save the file as "LED Tutorial.C", it will be available to include in the build. (don't forget to add the ".C" as the file type).
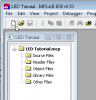
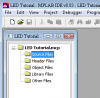
To include the file, the easiest way is to RIGHT click on the first directory in the "Project window".

When the window opens you should see your newly created C file in the workspace directory.

And once selected the file SHOULD appear in the "Project window" inside the "Source Files"

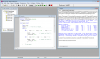
We should be able to build the project now... ( If your typing skills are ok! )
If there are any syntax errors, the build will report these in the output window.. Double click on the error and it will place the cursor on the offending line. Check the spelling, make sure each line terminates with ";" and all "0" are not "O" (some characters look like numbers and visa-versa ie. l and 1).
Here is the correct build.

The program can now be uploaded to a chip for testing.
I hope someone finds this useful. Its a bit daunting doing this for the first time.
If anyone has anything to add. Let me know ( I can't think of everything )
Happy programming!
I Thought I would make this "Help File" for anyone wanting to do this for the first time..
First off you'll need to download and install the IDE from Microchips web site
http://www.microchip.com/stellent/i...E&nodeId=1406&dDocName=en019469&part=SW007002 You need the MPLAB IDE vX.XX its about 112MB.. ( I know, BIG download )
Whilst you install, there will be an option to install the latest PRO version of Hi-tech C compiler.... Select "Yes". The full version will work for a month or so, but! As this has a full install, all the pro libraries will continue to work in "Lite" mode.
That done and out of the way. Double click your new MPLAB icon from the desktop, or the program menu if you didn't select that option. You will be presented with this.
Select "Project Wizard" in the project menu..
This is the first page in the project creation.
Select the processor from a HUGE list. I am using the pic16f628a. This chip is a direct replacement for the older pic16f84a, its cheaper and easier to get hold of. The main difference is the inclusion of a comparator module, a CCP module and a USART.. Oh and 1k more program rom.
Next second step is to choose your programming language. I personally use "C". but from here you can select MPASM as your toolsuite.
(Note.. If you have Hi-tech C for the pic18 series, it will select the correct tool to use)
The third step is to select a folder and name for the new project.
Select "Browse" to do just that.
In this tutorial I'm creating a project called "LED Tutorial".
First create a new folder and rename this folder to your new projects name. ( You can call it whatever you like, but I find things easier to manage if the folder, workspace and project are all the same name).
Second type in the project name "LED Tutorial" and select "Save".
Step four will allow you to add several files... "C", "ASM", Headers etc.. to your project.
For this tutorial we just skip over this step as we will be creating a new code file.
You are now done... The last screen shows that all your selections have been made and we are ready to proceed.
On selecting "Finish" we will be faced with our interface all ready to go.
The workspace now needs to be saved...( Automatically asks you to save the workspace )
After this has been done you will be face with an empty project... The processor selected is displayed in the bottom left on the "Status bar" along with working register and flag register statuses
OK!! Lets create the program to toggle an LED on and off (Boring I know, but we need to start somewhere ).
The first thing we need to do is open a new file..
Under the "File Menu" is a "New" graphical icon. Select this.
This will open a new window titled "Untitled*"... Type in a program. As I already mentioned I'm using C. This is a sample program to get us started.
Notice there is no syntax highlighting.. This is because the file isn't recognized as a C program yet!
If we save the file as a C file it will have this syntax highlighting making it easier to read.
Go to the "File Menu" and select "Save As".
At this point you need to make sure you select the correct directory. Place the new file in the workspace directory as I have done here.
Once you save the file as "LED Tutorial.C", it will be available to include in the build. (don't forget to add the ".C" as the file type).
To include the file, the easiest way is to RIGHT click on the first directory in the "Project window".
When the window opens you should see your newly created C file in the workspace directory.
And once selected the file SHOULD appear in the "Project window" inside the "Source Files"
We should be able to build the project now... ( If your typing skills are ok! )
If there are any syntax errors, the build will report these in the output window.. Double click on the error and it will place the cursor on the offending line. Check the spelling, make sure each line terminates with ";" and all "0" are not "O" (some characters look like numbers and visa-versa ie. l and 1).
Here is the correct build.
The program can now be uploaded to a chip for testing.
I hope someone finds this useful. Its a bit daunting doing this for the first time.
If anyone has anything to add. Let me know ( I can't think of everything )
Happy programming!